Ever sat in a taxi, watched the red digits tick, and wondered what the same drive would cost in Madrid? Or in a New York yellow cab? I did, so I built a meter.
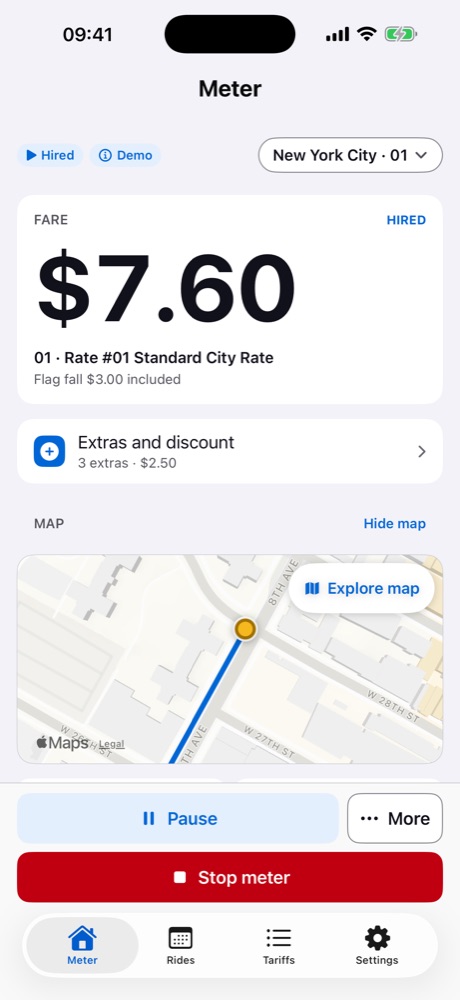
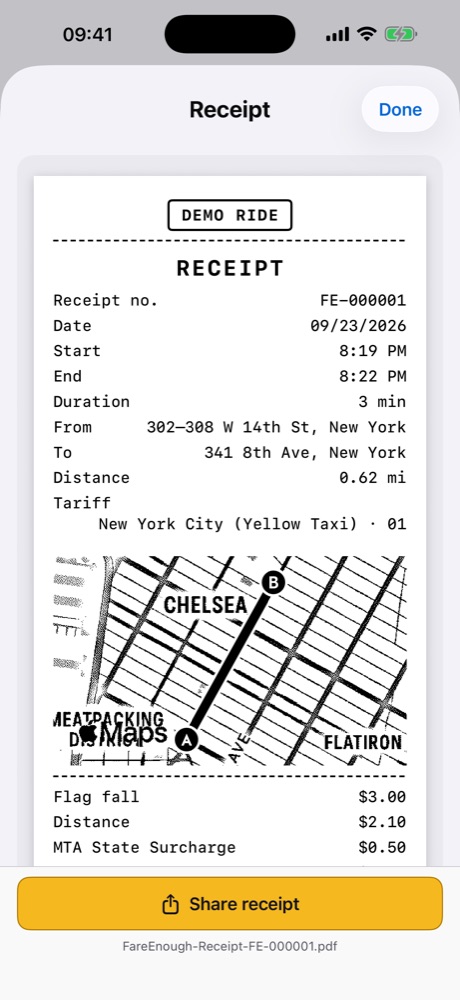
Fare Enough turns an iPhone into a taxi meter, just for fun. You pick a real city's published tariff, drive, and the app shows what the ride would cost there: distance from GPS, waiting time, night rates, extras like luggage. At the end you get a receipt.
Why a taxi meter, of all things
Somewhere there's a VHS tape (remember those, kids? 📼) of three- or four-year-old me in kindergarten, being asked what I want to be when I grow up. The answer comes without a second of doubt: a taxi driver. Life had other plans and I had to settle for IT, but I still absolutely love driving.
The other half of the story: LARP is my middle name. I owned a receipt printer before I owned a car. So far I've mostly been LARPing as a Dutchman, and now the kindergarten dream can be stitched into the act too. Four-year-old me would be very proud. Nobody else has to be.
What's in it
It's just an app, but here's what it does:
- Tariffs from 19 cities in 5 countries: Madrid, Barcelona, Berlin, Munich, Warsaw, Kraków, New York, Chicago, London, Edinburgh and a few more, each copied from the city's published rates. Night and holiday rates switch by themselves.
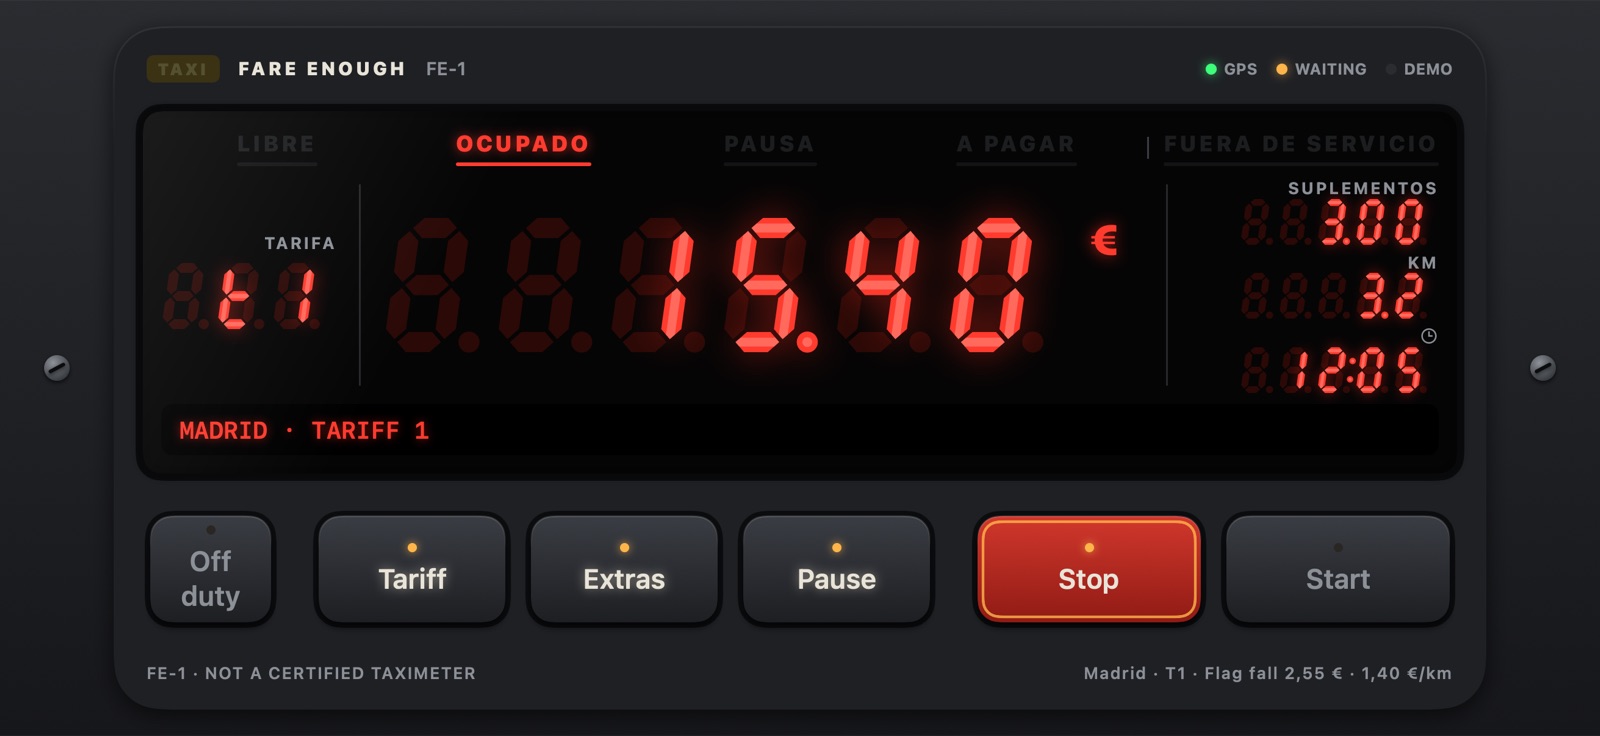
- Turn the phone on its side and it becomes an old-school meter, with glowing digits and chunky keys.
- A receipt at the end of the ride: a PDF, a picture, or paper from a tiny Bluetooth printer.
- The fare on the Lock Screen while you drive. CarPlay is built and waiting for Apple's permission.
- Discounts for friends, because you wouldn't bill a friend the real price, even for fun.
- Free, with no ads, no account and no analytics. Nothing leaves the phone except requests to Apple Maps.
It's waiting for App Store review as I write this (as Fare Enough Meter: "Fare Enough" was taken). fare.slnt-opp.xyz will have the link the day it's out.
Here's the meter's face to play with: a web copy, drawn with the same geometry as the app. Press Start.
Press Start for a ride
Now the fun part: the three things that took the most figuring out.
Skip, and a meter that has to survive Android
The app is SwiftUI today. Android comes later with Skip, whose Fuse mode compiles Swift natively for Android and renders SwiftUI through Jetpack Compose. The plan is that the port adds a handful of files and moves nothing. So the app has been written for it from the first commit: every Apple SDK call sits in one guarded platform file behind a protocol, and the core (tariffs, the meter's arithmetic, receipts) imports Foundation and nothing else.
How hard is a game-style view under those rules? Drawing turned out to be the easy part. On Skip, Shape and Path are the drawing API that crosses over. There's no Canvas, no TimelineView, no ImageRenderer in shared code, and nothing that carries meaning may depend on blend modes or 3D rotation. So every digit is geometry: hexagonal bars computed from the digit's height, with the italic slant built into the point mapping instead of a transform applied afterwards.
// A point in one cell, slant included: x' = x + (h − y)·tan 8°
func point(cell: Int, x: Double, y: Double) -> (x: Double, y: Double) {
    let left = originX + Double(cell) * style.pitch * height
    return (left + x + (height - y) * style.slant, originY + y)
}

// A horizontal bar: a mitred hexagon between two x's.
func horizontal(_ y: Double) -> [(x: Double, y: Double)] {
    let x0 = left + g, x1 = right - g
    return [pt(x0, y), pt(x0 + half, y - half),
            pt(x1 - half, y - half), pt(x1, y),
            pt(x1 - half, y + half), pt(x0 + half, y + half)]
}
The glow is four layers of the same path, like a real LED: the ghost (every segment, barely there, the "88.88" look), the bloom (the lit path, blurred), the body, and a thinner "hot core" on top. Each layer is one Path for the whole display, so it's one fill and one blur however many digits there are. The blur is decoration only: if Compose draws it plainer one day, the meter loses shine, not information.
ZStack {
    SegmentGlyphs(cells: ghost, frame: ghost, style: style)  // ghost
        .fill(Color(hex: skin.ghost, opacity: skin.ghostOpacity))
    SegmentGlyphs(cells: lit, frame: ghost, style: style)    // bloom
        .fill(Color(hex: glow))
        .blur(radius: barThickness * skin.bloomRadius)
        .opacity(skin.bloomOpacity)
    SegmentGlyphs(cells: lit, frame: ghost, style: style)    // body
        .fill(Color(hex: skin.lit))
    SegmentGlyphs(cells: lit, frame: ghost, style: style,
                  insetRatio: 0.28)                           // hot core
        .fill(Color(hex: hot))
        .opacity(0.35)
}
After that, a skin is just colours on the same geometry: red LED, amber, green, a cyan VFD and a grey LCD (plus a vintage one with rolling drums).
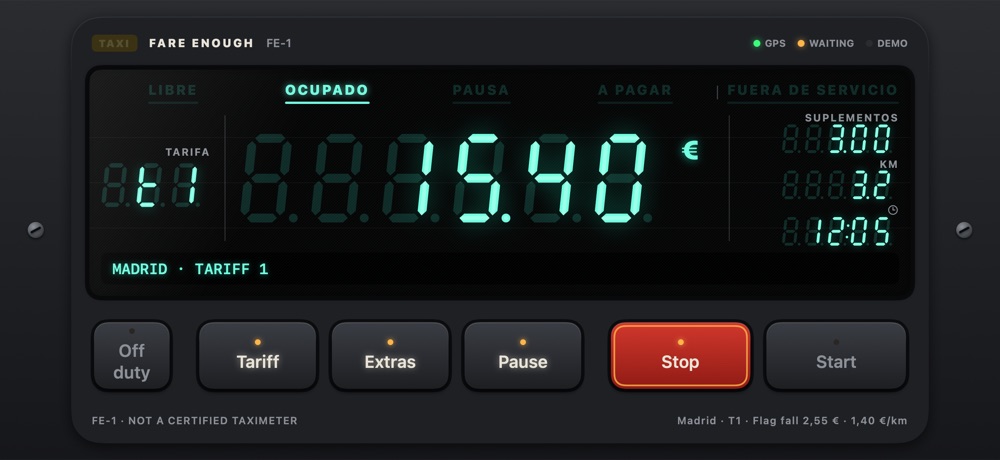
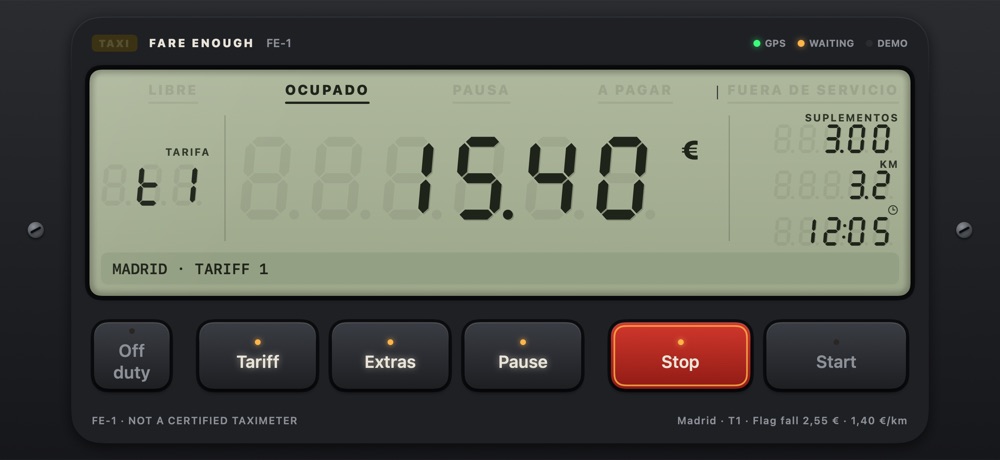
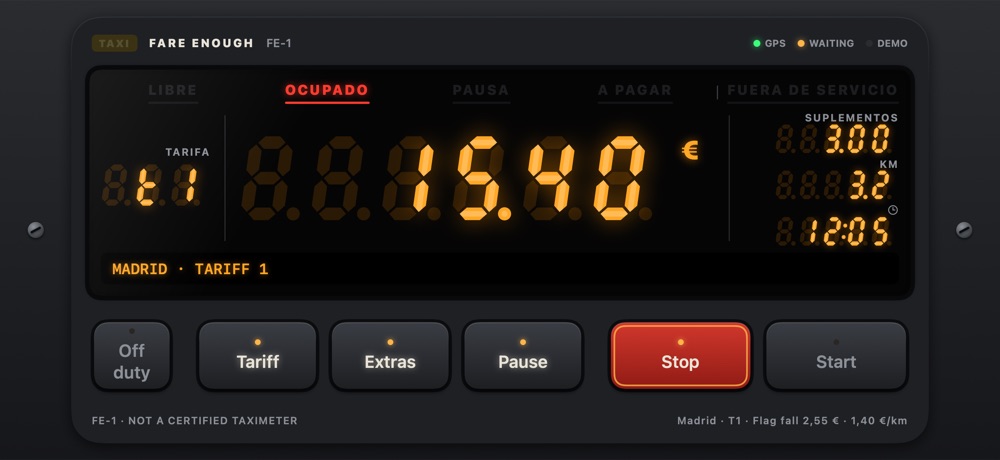
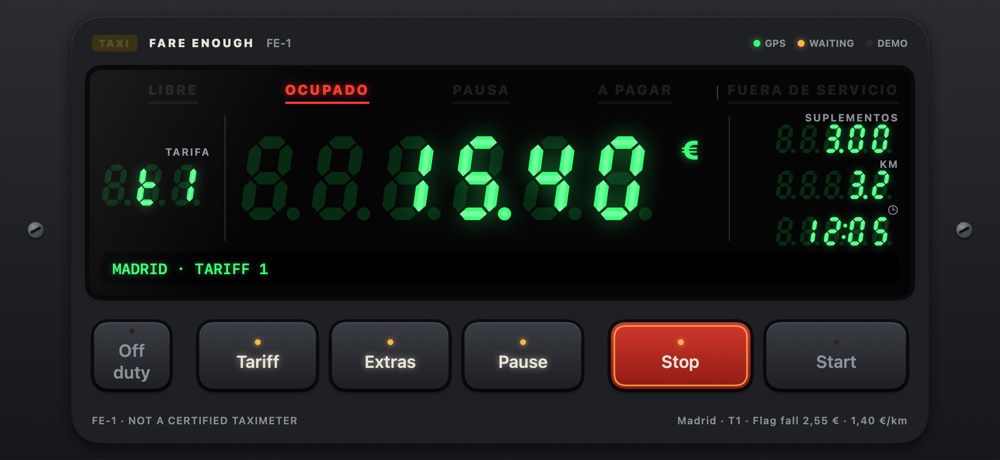
The blinking colon and the power-on lamp test run on a small Task loop at 2 Hz, only while the meter is on screen, because TimelineView doesn't exist on Skip. The keys needed a trick too: Skip has no custom ButtonStyle (only PrimitiveButtonStyle), so the pressed look lives in one compatibility shim with an Android branch:
func meterKeyStyle() -> some View {
    #if os(Android)
    self.buttonStyle(.plain)
    #else
    // Pressed: brightness −0.14 and 1 pt down.
    self.buttonStyle(MeterKeyPressStyle())
    #endif
}
The hard part is everything that compiles fine on iOS and only breaks on Android, weeks later. Text("Fare") looks the string up again in the device's language, so one row can mix two languages: it has to be Text(verbatim: loc("Fare")). didSet on an @Observable property never fires in the app (it does in unit tests, which is how it hides). ForEach over anything that isn't an Array aborts. Only 73 SF Symbols have an Android icon, and any other name silently draws nothing. .foregroundStyle(.tertiary) is a crash. None of that is caught by the compiler, so each rule is a test that reads the Swift sources as text and fails the build with the fix in its message. A rule that only lives in a document lasts about six weeks.
To be fair: the Android build doesn't exist yet. This whole section is a bet that it will be boring when it comes.
Background location, or how a drive became waiting time
A meter has to keep measuring with the phone locked in a car mount, and it has to ask for as little as possible: When In Use permission only, never Always. That works, but only when every piece is in place:
// A car on roads (.otherNavigation is boats and trains).
manager.activityType = .automotiveNavigation
manager.desiredAccuracy = kCLLocationAccuracyBestForNavigation
manager.distanceFilter = kCLDistanceFilterNone
// true = iOS stops a meter waiting in traffic, for good.
manager.pausesLocationUpdatesAutomatically = false
// Read from the *built* Info.plist: without the mode, this line kills the app.
if Self.hasLocationBackgroundMode {
    manager.allowsBackgroundLocationUpdates = true
}
manager.showsBackgroundLocationIndicator = true
// iOS 17+: held while the meter runs.
backgroundSession = CLBackgroundActivitySession()
manager.startUpdatingLocation()
The gotchas, in the order they bit:
- "Vehicle mode" is
activityType = .automotiveNavigation. It tells Core Location this is a car on roads, which changes how iOS filters the fixes and when it pauses them. pausesLocationUpdatesAutomaticallymust befalse. Otherwise iOS decides a car waiting at lights has arrived and pauses updates, and a paused background app doesn't get them back until it's opened again. Waiting time is exactly when a meter earns money.- The background mode has to be in the Info.plist file.
INFOPLIST_KEY_UIBackgroundModesin build settings silently never reaches the built app, andallowsBackgroundLocationUpdates = truewithout the mode doesn't throw: it kills the app. So the app checks its own built bundle first, and a script checks the built app before every release. - The first fix is often old news. Right after
startUpdatingLocation()iOS hands over its cached position, which can be the last drop-off hundreds of metres away. Fixes older than 30 s are dropped.
Then came the real field test. A drive in Magdeburg came back as 13 min 39 s of waiting time and no distance line, even though 1,15 km had been measured. The phone was handing its fixes over late, seconds behind or in bursts while locked, and the meter's clock billed every second as it passed, at the speed of the last fix it had: zero. Every second looked like standing still.
The fix is to let the fixes bill themselves. While they keep arriving, the clock stays out of it:
public mutating func tick(at date: Date) {
    guard state.status == .hired else { return }
    // Fixes are still coming, however late: each one bills
    // its own seconds, at its own speed, when it lands.
    if let arrived = state.lastFixArrival, state.gps.lastFix != nil,
       date.timeIntervalSince(arrived) <= state.gps.gapSeconds {
        return
    }
    // The GPS has been silent for 10 s: now the clock bills waiting.
    advance(to: date)
}
A late fix re-bills from the meter as it stood at the previous fix, and the fare on the screen never drops while it does. Replays in the simulator have to run at 1×: iOS stamps a fix when it arrives, so a sped-up replay is a faster ride, not the same ride sooner. The Developer page now also counts how the phone delivered its fixes (how many arrived in the background, how late, the longest silence), because a log you can read on the phone itself beats guessing.
A receipt printer for the price of a pizza
The Phomemo M110 is a pocket label printer: 203 dpi, a 384-dot head (48 mm), Bluetooth LE. The byte sequence comes from what two open-source drivers send (pyphomemo and phomymo, thank you both), and from a lot of printed test pages.
Finding it is the first trap. Most M110s advertise nothing but their serial number, like Q119G18Q0830029: Q, three digits, a letter, two digits, a letter, seven digits. The printer's services, FF00 and friends, are generic serial services that speakers, lamps and trackers use too. Matching on them once listed a neighbour's Bluetooth speaker as an M110. So the app recognises printers by name only.
The second trap is timing. Sent as one stream, the job makes the printer flash its light and drop everything. It wants the settings as separate writes with pauses, one raster header carrying the full height, the rows in small chunks, and the footer after a breath:
static func steps(for bitmap: ThermalBitmap,
                  settings: PrintSettings) -> [PrintStep] {
    // 1 bit per dot, 48 bytes a row; the height field is 16-bit.
    let rows = min(bitmap.height, 65_535)
    let raster = bitmap.rows.prefix(bitmap.widthBytes * rows)
    return [
        .write(speed(settings.speed)), .wait(0.03),      // 1B 4E 0D n
        .write(density(settings.darkness.density)),      // 1B 4E 04 n
        .wait(0.03),
        .write(media(settings.media)), .wait(0.03),      // 1F 11 n
        // GS v 0 with the full height, then the rows:
        // 128-byte writes, 20 ms apart.
        .write(rasterHeader(widthBytes: bitmap.widthBytes, rows: rows)),
        .stream(Data(raster), chunk: 128, pause: 0.02),
        .wait(0.30),
        .write(footer),                                  // 1F F0 05 00 1F F0 03 00
    ]
}
The third trap is pixels. The receipt is a list of drawing operations, and one SwiftUI view draws them for the screen, the PDF, the picture and the printer. For the printer it's rendered at exactly one pixel per dot, 384 wide: a 385-pixel image gets scaled by the printer's own app, and the scaling blurs every letter. The type is made firmer for the head (pure black, no hairlines), and the route map gets its own treatment. Apple's map is turned into a "print base": colour counts as paper, only what's darker than its neighbourhood survives (streets and their names), and blocks, parks and water go white. Then it's scaled to its final size and dithered. Dither at the final size, never before scaling: a dithered picture scaled again turns to grey mush.
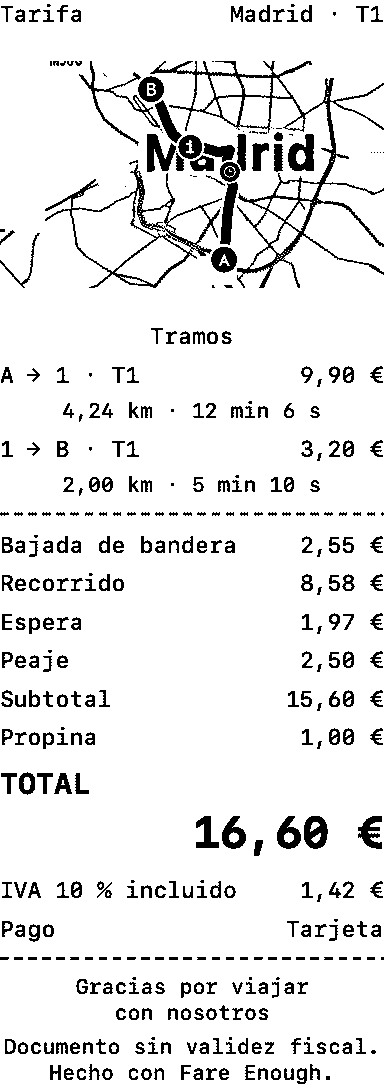
The preview in the app is that exact bitmap, dot for dot. The iOS Simulator has no Bluetooth, so the printer code also compiles into a tiny command-line tool for the Mac, sharing the very same CoreBluetooth file. One last surprise: macOS kills a plain binary that touches Bluetooth without a usage string of its own, so the tool runs inside a minimal .app wrapper.
Bonus: the Live Activity that was wider than the screen
On the iPhone's Lock Screen the ride's card was cut off on the left and padded on the right. On the Apple Watch it looked perfect. The culprit was the ride's clock: Text(timerInterval:) counting up to Date.distantFuture is laid out as wide as the longest time it could ever show, and sitting in a row that kept its ideal width, it pushed the whole card past the edge of the screen.
The fix: count to a day (the system ends a Live Activity after 8 hours anyway) and hold the width of "0:00:00" with a hidden placeholder, the timer drawn on top.
let aDay = start.addingTimeInterval(24 * 3600)
Text(verbatim: "0:00:00")          // the width the clock may take
    .hidden()
    .overlay(alignment: .leading) {
        Text(timerInterval: start...aDay, countsDown: false)
    }
    .monospacedDigit()
The Mac couldn't reproduce it, because macOS lays a timer out by the time it shows right now. So a UI test photographs the card on the simulator's Lock Screen.
That's it
Fare Enough speaks English, Spanish, German and Polish, and knows tariffs from Spain, Germany, Poland, the US and the UK. It's free, with no ads and no account. The four-year-old on that VHS tape would call it a start.
- Website: fare.slnt-opp.xyz
- Ideas, bugs, your city's tariff: info@slnt-opp.xyz
If you take it for a drive somewhere interesting, send me the receipt. Printed ones count double.